Getting Started with Java
The Java version of KillrVideo is a reference application for Java developers looking to learn more about using Apache Cassandra and DataStax Enterprise in their applications and services. It contains sample code that uses:
- The DataStax Java Driver for DataStax Enterprise
- Google's gRPC
These instructions assume you already have a Java Development Kit version 1.8 or higher installed.
Cloning and Setup
Like all KillrVideo implementations, the Java version uses Docker to run all its dependencies in your local development environment. If you haven't already, please read and follow the instructions in Getting Started to install Docker. Once you have Docker up and running, follow these steps:
- Clone the Java project's GitHub repository:
> git clone https://github.com/KillrVideo/killrvideo-java.git We use Maven to build and package the KillrVideo Java implementation. Make sure you have Maven 3 or later installed and initiate a clean build from the root of the repository. This will perform all GRPC code generation, compile the code, and run unit tests:
> mvn clean testYou should end up with the build output in the
targetfolder.Setup the Docker environment for the first time by running:
> ./setup-docker.shOr on Windows:
> .\setup-docker.batThis should create a
.envfile with some environment variables, as well as pull all the Docker images that the application needs to run.Start the docker dependencies that you just pulled down via
docker-compose:> docker-compose up -dThis starts up things like a DataStax Enterprise node, the Web UI, etc. You can learn more about how we use Docker in our Docker Guide documentation.
Running the Code
Now that you've got the environment setup and the project built, you can run the project and explore the code in your IDE of choice with a debugger attached. We have instructions for running KillrVideo in a couple popular IDEs:
Running in IntelliJ IDEA
To debug in IntelliJ IDEA, you'll first need to create a Run/Debug configuration.
In IntelliJ IDEA, select from the
File->Newmenu theProject from Existing Sourcesoption and then select the directory where you cloned the Git repository. Select the option which configures the project as a Maven project. This will enable you to run Maven targets such as those referenced above from the "Maven Projects" window (typically in the upper right).Create/edit a run configuration for the main class by selecting the
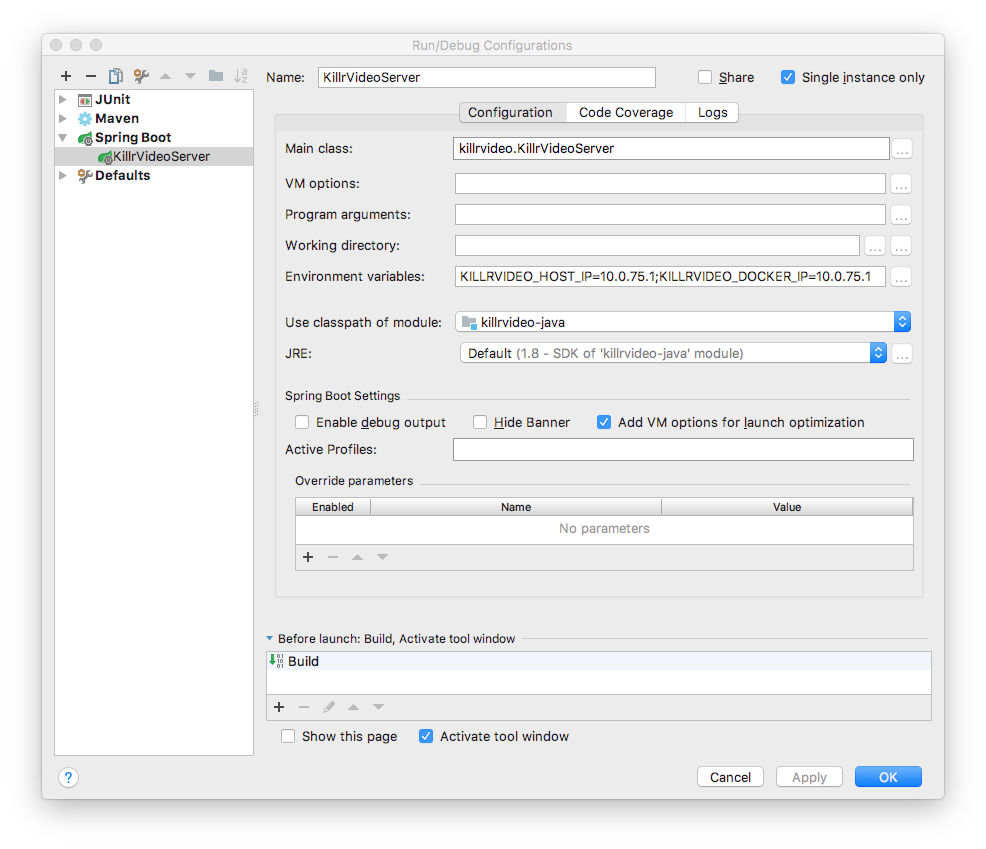
Run->Edit Configurationsmenu option and selecting the main classKillrVideoServer, which should be listed under "Spring Boot Configurations" at left. In order to run in the IDE, you will need to set the same environment variables as were set in the.envfile you created above when running thesetup-dockerscript. For an example of this configuration see the following image:
Once the configuration has been created you can invoke it from the Run menu or by right clicking on the
KillrVideoServer class in the "Project" window to the left.
Running in Eclipse
To debug in Eclipse, you'll need to import project and create a Run/Debug configuration.
Patch m2e Eclipse to work
maven-os-plugin: Asm2edoes not evaluate the extension specified in apom.xmlyou need to install an additional Eclipse plugin. To do so please downloados-maven-plugin-1.5.0.Final.jarand put it into the<ECLIPSE_HOME>/pluginsdirectory. (As you might have noticed,os-maven-pluginis a Maven extension, a Maven plugin, and an Eclipse plugin). You will need to restart eclipse.Import Maven Project: In Eclipse, select
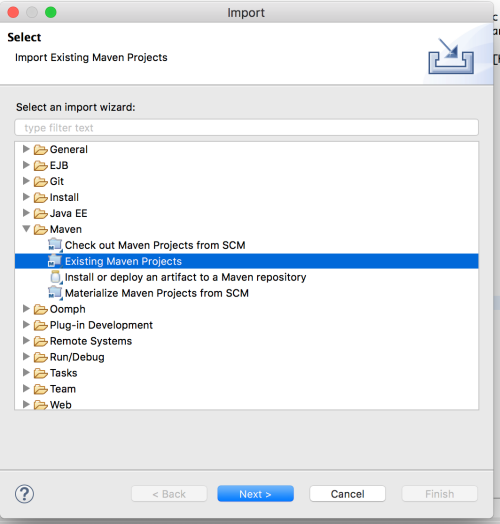
File->Import, in the menu pickMaven>Existing Maven Projectsand select the directory where you cloned the Git repository. Thepom.xmlfile should appear in the list, validate that associated box is checked then clickfinish.
- Update classpath: During
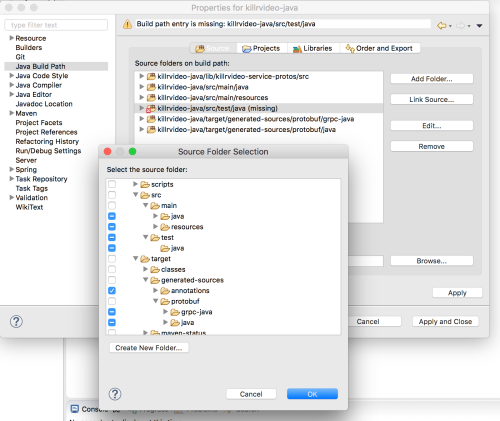
buildmaven phase classes are generated for both GRPC and Gremling DSL ingenerated-sources. Eclipse does not include all paths by default to the classpath, you need an extra configuration step. Right-click on your project and selectproperties. Then, in the tree on the left part of the wizard selectJava Build Path,Add Folderand browse project to checktarget/generated-sources/annotationsbox as displayed in the picture below, apply and close. You project should now compile without error in the UI.
- Run configuration: Right-click on your project and select
Run As...>Run As Java Applications. (if you are using Eclipse STS you can alsoRun As...>Run As Spring Boot App). On the main tab enter nameRun KillrVideoand for main class field please usekillrvideo.KillrVideoServer. You will need to set the same environment variables as were set in the.envfile you created above when running thesetup-dockerscript. SelectEnvironmenttag and add the variables as shown in the picture below :KILLRVIDEO_HOST_IP,KILLRVIDEO_DOCKER_IP

Running as command line
The purpose of KillrVideo application is to illustrate how to implement an application with DataStax Enterprise and thus
we expect you to import the source code in a IDE to manipulate and understand the code. To simply execute the application
you can execute the following:mvn spring-boot:run -D=KILLRVIDEO_HOST_IP=10.0.75.1 -D=KILLRVIDEO_DOCKER_IP=10.0.75.1
Opening the Web UI
When the Java services start, you may see repeated attempts in the output to connect to DataStax Enterprise
(DSE). This behavior is expected, especially the first time you run the application and the database is being
initialized. The services should connect within a couple of minutes. Once the application has initialized you can
open the web application at http://localhost:3000.
The services are exercised by your actions on the Web UI, as well as the KillrVideo Generator which runs as part of the default configuration.
Using DataStax Studio
The docker-compose file that you ran above started an instance of DataStax Studio,
an interactive tool for querying, exploring, analyzing, and visualizing both graph and tabular data.
Check out the Using DataStax Studio page for more information.
Learn More
Check out the Documentation section for a lot more information on the architecture of KillrVideo and how the Web Tier interacts with the microservices running on your machine.